Get Started Using the Add-in
The add-in is free for evaluation and light use.
Registration is not required to try it. Signing into the add-in will enable significantly more updates.
How to Install the Add-in
The add-in is very easy to add from within Microsoft Office - Update your first document within minutes.
In Excel (then Word or PowerPoint):- Select “Add-ins”
- Search for "Excel to Word"
- Click "Add" and agree to the terms and conditions
The add-in icon (which says "Automate Content") will appear on the right side of the Home ribbon, and it will open in the right task panel.

If needed, get the Connection ID from the 'Submit' tab of the Excel add-in, then paste/type it into the field under 'Connection to Excel' on the 'Update' tab of Word and/or PPT . Then click 'Connect'.
'Sign in' for more usage or to access your subscription.
The add-in works with Office for Windows and Office for Mac. Requires Microsoft Office 365 (Subscription Version) or Office 2019 or newer.
Need help? See Troubleshooting Guide
This quick video gives an overview of the add-in and shows how to get started
Alternate Install Methods
Issues getting started?
How to Update Documents
If you have documents that are already linked (using the add-in) and you want to perform updates: Make changes to your Excel workbook, then follow these 2 steps:
- "Submit Content" from the Excel add-in
- "Update Document" in the Word or PowerPoint add-in
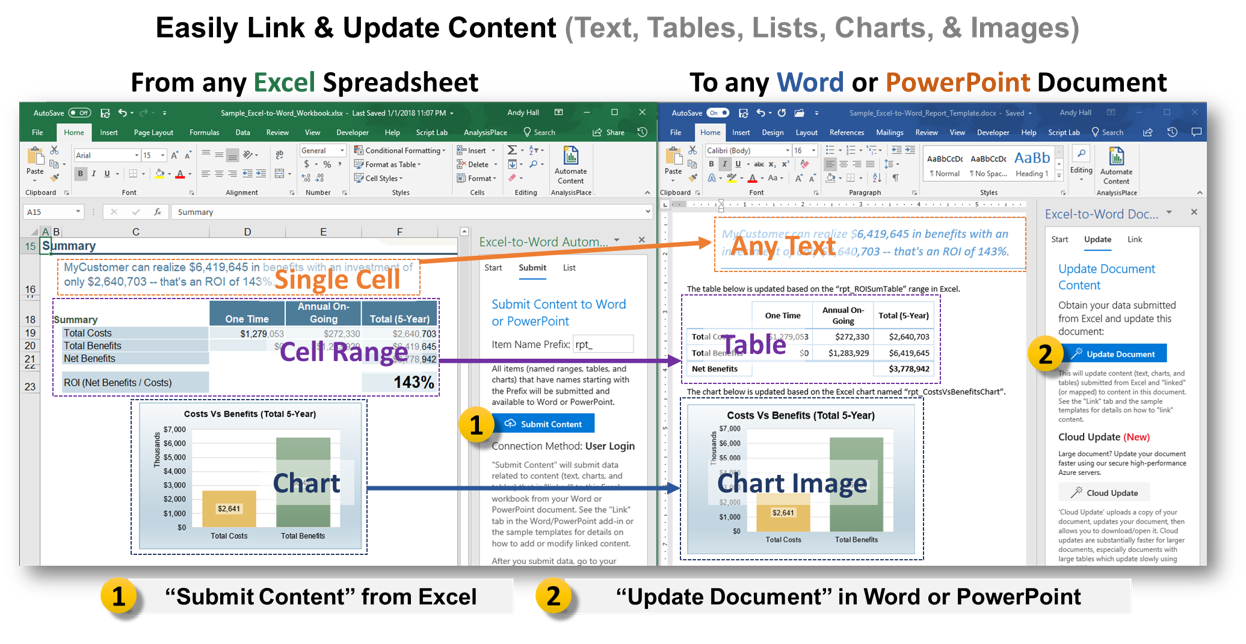
How to Link Documents
Initially, your Word or PowerPoint document needs to be LINKed to your Excel workbook once, then you can UPDATE the document many times or by many people.
If you want to link new or existing documents (Word to Excel or PowerPoint to Excel), view the resources below.
- In Excel, name source items (cells, ranges, tables, shapes, and charts)
- Then link (associate) those source content items to destination (Word or PowerPoint) content items using the add-in.
In the add-ins, instructions can be found:
- In Excel: on the List tab, under “How to Name Content”
- In Word: on the Link tab, under "Details"
- In PowerPoint: on the Link tab
Excel-to-Word Linking Tutorial
Learn how to link a variety of content, including text, tables, charts, images and shapes, from Excel workbooks to Word documents
Excel-to-PowerPoint Linking Tutorial
Sample Content and How-to Guide
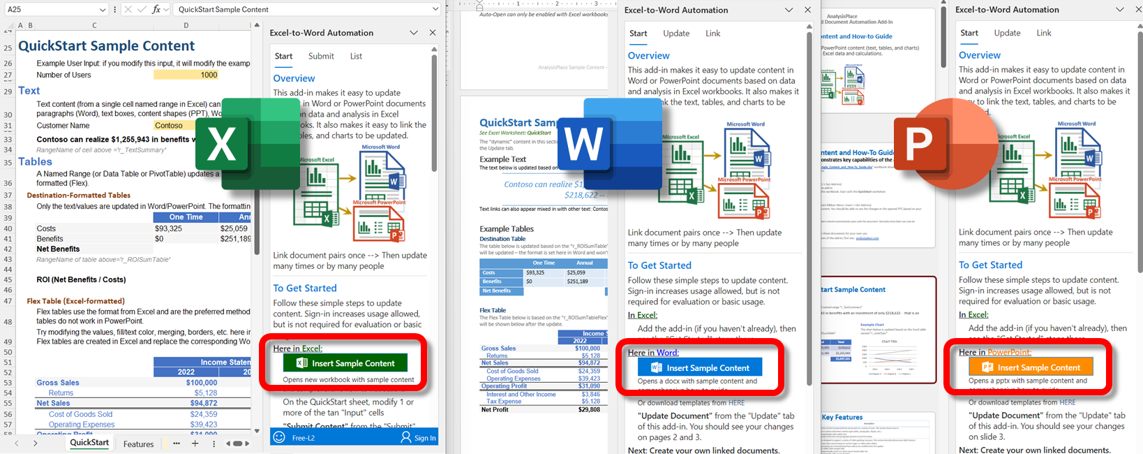
A great way to see how it works and to try a variety of features is to use the "Sample Content and How-to Guide" documents. The sample content exists for Excel, Word, and PowerPoint.
The sample content contains comprehensive how-to instructions and examples for many features, including: Flex (Excel-formatted) Tables, Destination-formatted Tables, Shapes, PivotTables, Currency Switching, Multi-lingual Reports, Advanced Charts/Graphs, Automatic Table Resizing, HTML formatting, Document Assembly (Conditional Content), Auto-Hide rows/columns based on cell value, Conditional Submit, Table Merged Cells, Dynamic Lists, and Paragraphs, Professional Word layouts, Mail Merge, etc.
How to Insert the Sample Content and How-to Guide
Follow the simple steps on the "Start" tab of the add-ins, under "To Get Started" and "Insert Sample Content".
Resources
View other helpful resources, including how-to guides/videos and sample templates.
Alternate Install Methods:
From Microsoft's AppSource Website
- Click here to access our add-in directly through Microsoft.
- Sign in to your Microsoft account or sign up for a new free account.
- Click "Get it now"
- Accept permissions. If you are a Microsoft 365 Admin you will be able to deploy the add-in to your entire organization or specific users or groups from this page.
- Choose an application to get started
- Launch the Add-in by choosing “Got it” then click on the Add-in to open.
- Start in the application you just opened or open a new or existing application.
Using Centralized Deployment
Microsoft 365 administrators can deploy the add-in for users using Centralized Deployment.
Issues getting started?
See the Troubleshooting Guide.
If you cannot access the Office Store: if you see "Sorry, Microsoft 365 has been configured to prevent individual acquisition of Office Store add-ins.", it means your Microsoft 365 administrator has disabled access to the Office Store. You can ask your administrator to deploy the add-in for you using Centralized Deployment.
If you Need Admin Approval: Your company may require admin approval to use this add-in. Contact your Microsoft 365 administrator to request access.
Note that you cannot add new add-ins to protected Excel workbooks (in Windows). You must first add the add-in to a new or unprotected document (you only need to do this once). Then open your protected workbook, then you should be able to activate the add-in from the ribbon "Home" tab.
If you have any issues, you can Contact Us from within the add-in